Showing posts with label Easter. Show all posts

Wednesday, April 04, 2012

How to make toilet paper tube bunnies


Super simple craft using toilet paper rolls. First I cut out the ear shapes and coloured the inside of the ears. 
I then glued them in side the top of the TP roll and I glued and pinched the top of the roll closed. I used a glue gun since it was already out and required less holding and waiting for glue to dry.
The tail is a cotton ball, the nose is a heart shaped bead and the rest of the face is just marker.


If you wanted to make these with kids and you can either do the glue gun part yourself or use white glue and a clothes pin to keep together until it's dry.

Hoppy Easter :)


Tuesday, April 03, 2012

How to teach the Alphabet - E for Easter Eggs


For the letter E I thought eggs would be cool, but I was originally just thinking of using white egg shells but then Isla wanted Easter eggs so I remembered a craft a did with Lilo a few years back and thought it would be perfect for us to do. 

First I cracked and cleaned 4 egg shells (save for later or use for breakfast). Remove the inside membrane of the egg, it sometimes comes off easily, other times it's a pain. And then break the shells in pieces and put into 4 ramekins. 


Then I filled the ramekins with vinegar and water and let Isla add the food colouring. 


A few drops in each and then stir.


And let them soak for a few minutes.


Then drain and let dry on a cookie sheet (ignore the gross looking cooking sheets)


Once they are dry we put them all in tin pie pan and mixed together. It was fun to play with them in the pan, mixing them all up.


Cut out the letter E and glued on to another sheet of paper. Add add white glue on the E and add egg shells.  Add more glue if you need and add shells to fill in all spaces.


And let dry.


Then hang up with others.

The Letter D for Donut
The Letter C for Circles and Clown
The Letter B for Bubbles
The Letter A for Alligator


Monday, April 02, 2012

How to make Crystals


So I found another super awesome idea on Pinterest from Housing a Forest, which is a great blog with lots of great ideas to do with kids. 
The crystals are made by soaking pipecleaners into a borax solution. You first make the shape you want out of pipecleaners. We did Easter eggs and chicks but you can do any shape, how beautiful would snowflakes be in the winter, or flowers for wedding decorations.

Once the pipecleaners are shaped how you want tie them to a string and find glass containers to suspend them in. On Housing a Forest she used large mason jars but I couldn't find any in my house so I found an old pickle jar and some other storage containers we weren't using.
The borax solution is 3 cups of boiling water to 1/2 cup of borax. Stir to dissolve. Then put your pipecleaner creation in and tie to a pencil so it's not touching the bottom. I tried 2  in one container since I could find any others and it worked, just try to have them not touching otherwise they would probably get stuck together. 


Now leave it over night. 


Before I went to bed I took a bit and could see the crystals starting to form.


And here are the final product. They look super cool. The crystals stay on pretty good. I wouldn't let little ones play with them since borax is toxic (or something).


You can see that the size of container and concentration of the borax solution created larger crystals on the egg above and smaller ones on the chick.


This was one of the eggs that shared a container with another one and crystals still formed. 

I think we will be trying this again - nice to have another thing to use the borax I bought for the flubber we made years ago. 

Friday, March 30, 2012

How to make an Easter wreath


I haven't really been into wreath other then for Christmas but there are so many cute ideas out there that I've been converted. So I decided to make an Easter wreath - isn't it cute :)


I started by making the wreath form out of newspaper. I rolled up newpaper to make the basic shape and then wrap more rolls of newspaper around and tape in place until it makes the shape and size you want. I then wrapped masking tape all around so it was a solid colour.

I wanted to cover the wreath in this green grassy/straw stuff I had bought last year from the dollar store. But I didn't have a lot of it so I thought it would be best to paint the wreath with green paint so it wouldn't matter if you saw the wreath form under the grass.

 I bought a pack of mini plastic Easter eggs at Dollarama and wanted to make them less neon so I applied Mod Podge all over them and then rolled them in and sprinkled on top, clear glitter and let dry.


I then made little flowers from just white construction paper and stuck a cheap dollar store pin in the middle.


Aren't they pretty?


After the paint dried I cut up the grass and used white glue painted on thick to stick it on the wreath. Doesn't it look like Oscar the Grouch?


I didn't put any on the back since I didn't have much and well it will be against the wall any ways.

Once it was all dry I used a glue gun to add the eggs, grouping them in 3s. Then I just pushed the flower pins into the wreath. 

The bow is just a piece of fabric wrapped that I glue gunned into a band to go around to hang and then to form a bow. To hang it on our front door I made a hook from a pipecleaner. Too bad we have a screen door that will block it a bit, oh well, it's still pretty.

Tuesday, March 27, 2012

How to make Easter Egg cookies


These cookies are pretty easy to make and they require no cookie cutters or decorating afterwards. I know that's part of the fun but my kids get bored half way through and I'm left rolling out and cutting the rest of the cookies. So this worked out great.

 First make up a batch of sugar cookies and then separate into 4 bowls. Add a bunch of drops of food colouring in each bowl and mix. First mix with a spoon and then get your hands in to mix it in good.

I found mixing small handfuls at a time the easiest way to get the colour all mixed in. The girls had fun mixing - it was like playdough but they could eat some as they played with it.


This is why I suggest mixing with a spoon first. You'd think I would have learned after the first colour but as you see I have at least 3 colours on my hand. 


Now you have 4 pretty balls of dough.


On a piece of wax paper we made ropes of dough and layered them together. 


Then roll them up, pressing all the colours together. Try to form the roll so it's a egg shaped - so narrower at the top. Put in the freezer so 15 mins.


Take out of the freezer and cut into 1/4" slices.
Then put on a cookie sheet - you might want to re-shape them so they are more egg shaped before baking. 


And here you go, beautiful Easter Egg cookies.


 We also made a few roll out cookies with some of the extra dough and made some tie dyed looking flowers and bunny.


Friday, March 23, 2012

How to be crafty for Easter - crafts from the past.

Yesterday we started to decorate and make a craft for Easter. I will show our new craft soon, just need to take some more photos of the finished product but in the mean time I thought I'd show some of the Easter crafts I've made in the past to inspire.


Lilo and I dyed egg shells and then glued them to an Easter Egg along with glitter. Check it out here


A grass Easter egg holder made from an egg carton. Check it out here.


A non-chocolate treat for kids on Easter - a disposable icing bag filled with goldfish crackers and tied with a ribbon. Check it out here.


I made noise makers/ egg shakers from plastic Easter eggs and dried beans, rice, lentils and glued and taped them together. Check it out here


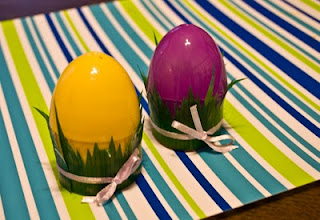
And I love these I made last year - Egg holders made from a piece of a toilet paper roll and some sushi grass. Check it out here

Happy Easter crafting.

Sunday, August 21, 2011

How to make a cardboard flower

After seeing beautiful cardstock flowers on The Little Hut I was dying to try to make one. So when we were visiting my sister-in-law and family around Easter I was inspired by a Barbie box that Isla got for her birthday. I cut out petals from the box, taped and glued the flower together. Check out The Little Hut for instructions. I didn't follow it 100% but just went by memory of her post - pretty close though. I thought they colours of the Barbie box made a perfect flower.

Saturday, March 26, 2011

How to make an egg holder with sushi grass

I've been collecting the plastic grass that they put in take out sushi, it just looked like something I could craft with. With Easter coming I thought I needed to pull it out.
To make just cut a piece of paper towel or TP tube into a 1/2" ring. Then glue 2 pieces of sushi grass around. To hold it together and make it look cuter, I tied a piece of ribbon around. And done. I love fast crafts.
And I just had to share the picture I captured today of Lilo catching a rainbow.

Thursday, April 23, 2009

How to make old easter eggs into egg shakers

I got this idea after being in the instrument section of the toy store - egg shakers, they are called ocarinas, they are like maracas with out the handle.
So this is the easiest thing - just add some rice (different kinds), lentils, dried chick peas, rice crispies or whatever you want into a plastic egg and glue closed. I then taped them up so they could be played with right away. But hours later I took the tape off and the glue still didn't hold, so I need to figure out what glue works best on plastic - any ideas?
Even with the tape left on they are fun to play with. We added different things in each one and it's neat to hear the different sounds they make.