Showing posts with label parties. Show all posts

Tuesday, April 24, 2012

How to make play microphones


For Isla's dance party I was thinking of a craft for the kids. I was originally thinking of making instruments with them but one day after Isla's ballet class I saw her dancing and singing into her hand as a microphone and thought microphones would be fun.


Here's what you need to make your own
-Styrofoam balls
- Toilet paper rolls
- black paper (or I used adhesive blackboard paper that I got at the dollar store)
- Mod Podge
- Silver Glitter
- 2 pie pans (or something to collect the glitter)
- Scissors
- Paintbrush
- Glue gun
- Egg Carton 
- Wooden skewers


First we put the Styrofoam balls on a skewer and coated with Mod Podge.


Then add glitter. I added the glitter over a pie plate to catch the extra. I used the saved glitter and transferred back and forth to each pie plate over the balls.


Once they were all covered I stuck them in an upside down egg carton to dry. 


Once they were completely dry I coated them with another coat of Mod Podge so the glitter wouldn't be falling off all over the place. And then stuck them back in the egg carton to dry again.


I covered the toilet paper rolls in the adhesive blackboard paper. Once the glitter balls were dry I applied a generous amount of hot glue to the top of one end of the TP roll. 


Take the skewer out of the ball and stick on top of the TP roll. Using the skewer I smoothed out the dripping glue. I added a bit more glue and smooth to make sure they weren't going to come off once the kids were playing with them.


They were pretty easy to make and didn't cost much. It cost only $2 for 2 packs of foam balls from Dollarama since I had everything else already.

And since the base is chalk board I had planned on having the kids write their names and decorate with stickers but we didn't have time with all the dancing and playing. 


Isla handed them out at her dance party and everyone had a blast singing into them.


They also made fun favours for the kids to bring home, I know my girls will be using them lots more. 

Monday, April 23, 2012

How to make a Disco cupcakes


So I haven't posted much last week because I was making, planing and get things together for my daughters birthday. We had a dance party for her. We rented a room at the local rec centre, my husband rented some lights and brought his stereo and we all had a blast. We danced, we played musical chairs, limbo and many rounds of freeze dance. It was a lot of fun.
To go with the dance party theme I was trying to think of a fun cake or cupcakes as it turned out to be. Cupcakes seemed much easier then trying to cut cake into pieces.

Isla helped bake the cupcakes, it was confetti cake mix that I made using the Saucy Sprinkles baking variation - butter makes everything taste better. I made purple chocolate stars using purple melting chocolate that I bought at The Bulk Barn and a star mould that I also got there. It was pretty easy to do, I did it a few days a head of time. The day before the party I made the pink icing but I didn't ice the cupcakes until the morning of the party (the party started at 2pm). I piped on the icing and the girls put the star on the top and add an assortment of purple and pink sprinkles, multi coloured star sprinkles and silver balls. At first I thought I wanted to add the decorations so they could look like Martha creation but then I thought it's her party and she wants to decorate them so why not and they looked great. 


The centre piece of the cupcakes is the disco ball which was bought at the dollar store and I placed it in a margaritas glass. It gave it some nice height.


I was trying to figure out what to put the cupcakes on that would be big enough to fit all the cupcakes and I finally thought of a pizza pan. I fancied the pan up by adding a bunch of curling ribbon around the back side of the pan.


I cut the ribbon, then curled, then taped.


I found an old tin book to put under the pan to add more height and show off the ribbons. I just covered the box with tissue paper to look nicer.


I'm really happy with how it turned out and it wasn't too much work. Isla liked it too, even though I think she only ate the sprinkles and icing.


So now my baby is a big girl. She is very proud that she is now 4. 

Wednesday, November 16, 2011

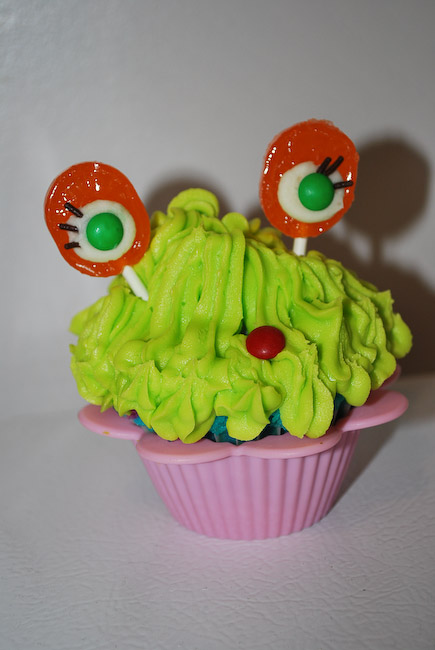
How to make pretty monster cupcakes

Since Lilo's birthday is around Halloween she decided that she wanted monster cupcakes for her birthday, but not scary monsters. I showed her the monster cupcakes I made for a Halloween party but she thought they were too scary, so I thought brighter colours but same concept would be good. And then I also found some great ideas on Pinterest.
 I was trying to make big cupcakes that rise tall, that didn't work but instead they were just too big for little kids - oh well. To make them taller I put 1/2 a marshmallow on the top of the cupcakes. To cut the marshmallows run your knife under hot water and after you cut one marshmallow, rinse knife again.
Then pick a fun piping tip and add your coloured icing. The icing is about 1 1/2 cups of soften butter, about 3-4 cups of icing sugar, and a splash of milk - I don't measure just taste test. To ice the cupcake, start from the top of marshmallow and bring down to the edges and repeat until the cupcake is covered.
The eyes are just suckers with a dot of white icing and a mini M&M - the eyelashes are 3 chocolate sprinkles. And then I added a red M&M for a nose (or mouth).
And to make rainbow cupcakes you just divide and dye the batter and layer before you bake.

I made 3 different coloured monsters, using a different tip for each colour. The kids ended up eating the suckers and a bit of icing and that's it. Next year I need to make mini cupcakes instead.

Saturday, April 16, 2011

How to make a mermaid cake


My little baby turned 3 on Monday, I can't believe time has gone by so fast. When I asked her what she wanted for her birthday cake, she said a Barbie, mermaid, princess, ballerina, fairy cake. I decided to narrow that down to just mermaid - well Barbie mermaid.

I had great ideas of making a mermaid by molding it out of rice crispy cake - you know it looks so easy on tv - but then I thought better and decided to just buy a mermaid Barbie. This way it's a cake topper and present in one. To ice the cake I took inspiration from the movie Mermaidia - a Barbie movie the girls have watched too many times.

I started by making 2 round cakes, I made them rainbow by separating the batter in 3 and adding food colouring to each and then pouring them in the cake pans. I also made another batch of cake and cooked part of it in my Pampered Chef big mixing bowl and made cupcakes with the rest. The cake from the mixing bowl made the rock for the mermaid to sit on.

Before icing it all I leveled the cakes off and made sure the Barbie could sit on it.
I then iced the round cakes. I iced it in blue icing and then mixed up a darker and lighter blue and swirled it around look like water.

I iced the rock on a separate board with wax paper underneath so I could lift it on the blue cake. I made a purply grey icing for the rock and added some sugar crystals on top to make it sparkle. If you make something like this don't make the rock black - I saw some online that made their rocks black and it looks like the poor mermaid is stuck in tar.
Then I plopped the iced rock on top of the water. I piped some blue icing around the rock and pulled it up on the rock to look like waves. I had some blue tinted sugar that I sprinkled on top to make the water shimmer.

I think it turned out pretty good and more importantly I think Isla liked it.

Sunday, January 23, 2011

How to make 4 different rainbow cakes

I realized that after Lilo's past birthday when she asked for a rainbow cake that I've made her a rainbow cake for the past 3 years.
Lilo's 3rd birthday was the start of the rainbow cakes. This layered cake was a lot of work - many batches of cake mix. I decided that I wanted to make the cake from scratch, not sure why. The cake was a little dry, some layers tasted better then other but I've learned to just stick to cake mixes, my mom always used them and they were always great so I'm going with it.
The layered rainbow cake idea came from here.

Lilo's 4th birthday we did rainbow cupcakes. I used cake mix this time but found a variation here, on Saucy's Sprinkles that makes it even tastier - replace the oil with melted butter and whip it all up.
To add extra fun to these cupcakes all the kids got a tray with treats to decorate the cupcakes with - it was a lot of fun that I think I will do again another year.

So for Lilo's 5th birthday she asked again for a rainbow cake so here came version 3. Again an idea from Saucy's Sprinkles blog to divide the batter and dye it up. Then scoop them into the pan and since the batter is nice and whipped the different colours don't run into each other.
I made the cake in a Pampered Chef batter bowl in 2 batches and layered them and trimmed to make it into a beautiful princess cake. Here's the directions. It was a fun surprize for Lilo's friends when I cut in and it was rainbow inside. And a freaky surprize when she pulled the Barbie out and found out the Barbie was only a torso.
And then for fun this summer when we had friends over I made the "Double Rainbow" cake. Remember that crazy Youtube video that was everywhere. Well I saw this idea and thought it would be a fun dessert. I made the cake with a angel food ring cake mold and cut it half, covered with icing and then M&Ms. I got Lilo to help me sort out the M&Ms and we got to snack on the brown ones.
Now to come up with a 5th version for her next birthday :)

Thursday, April 15, 2010

How to make Yo Gabba Gabba cupcakes


Isla had her 2nd birthday party last weekend. I can't believe it's been 2 years already.
Since she's a big fan of Yo Gabba Gabba it was Lilo's idea to make her these cupcakes. They were a lot of work but lots of fun and I'm super proud of how they turned out.
Here is my inspiration while I was working - plus I found some other great cupcakes online that I also used as inspiration.
I first started by making the eyes and add ons the night before. I made them with melting chocolate put into parchment piping bags. The eyes are just white chocolate and a brown mini m&m in the centre.
Then I melted other colours to make flowers, ears, mouths and their other weird things on their faces :) I piped them on to wax paper and let dry. They come off easily. For the flowers I started by drawing on the back side of the wax paper to use as a pattern to trace but then I found it just as easy to free hand it.
Then I started icing the cupcakes. I wasn't sure how to do it at first to get a smooth look. I started by just using a knife but that wasn't looking great so I tried piping it. It worked so much better. I just piped the outline of the head shape and then filled some inside.
I smoothed it out with a wet knife. I had a wet paper towel to wipe the knife clean between cupcakes. Then I dipped the knife into a glass of water before smoothing. Worked great.
Here are all the different bases for the cupcakes. I only had one icing bag so I washed out the bag between each colour (a pain but I planned it well) I started with the pink, the extra icing I turned red. I also mixed the extra yellow and blue to make the green - I added a bit more yellow colouring to make the colour green I wanted.
Then I added all the chocolate pieces as well as used a small tip to add details.
I love how Plex turned out. I was most nervous about making him and now he's my favourite.
Brodee - you don't get the true goofiness of him without his body.
Foofa - I made the pink icing a little darker than I had planned - I was trying to get it lighter than the chocolate. It doesn't take much of the gel colouring to dye the icing. Oh well, she's still cute. I added a yellow m&m to the flower and painted eyelashes using the gel colouring with a thin new paintbrush.
Mono - who can't like Mono and his big eye. The red m&m for his spots turned out cute.
Toodee - her eyes are a little off but still a sweetie.

Also in case you're wondering - I didn't make 2 cakes. The Elmo cake was made by my friend Deb for her daughter - our girls birthdays are only a week apart so we did a joint party for them. She made her cake by renting the cake pan at Bulk Barn. They have the icing pattern on the pan as well. She did a great job. Lots of stained tongues after this party.

Thursday, October 22, 2009

How to throw a 4th birthday party

So little Lilo is 4 now - time does fly. I didn't do a big theme this year, it was just cupcakes. I made a rainbow out of cupcake.
I made 48 cupcakes - 2 batches of cake mix. I used this variation to the back of the box instructions from Saucy Sprinkles - 3 eggs, 1/2 cup melted butter and 1 cup water - beat with mixer and bake for 20 mins at 350. I don't think I'm going to try and make from scratch cake again - last years cake looks awesome but was really dry.

Then I gave each kids a little muffin tin that I filled with different candies to decorate their cupcakes with. Lilo nicely decorated hers, then ate the candy off and re-decorated - innovated young lady :)

Once my mom showed Isla what to do, she got into it too.

Alex just wanted to eat the cupcake, didn't want to fuss with the decorating.

Austin was concentrating hard on what he was doing.

Izzy sampling her creation.

Maddie was working hard with mom to get the right look.
I think Mom helped out a bit here :)

I also made aprons for all the kids - I forgot to get a picture of all them together. Oh well, here's Izzy modeling hers.


Instead of goody bags, their giveaways were the aprons and muffin tins (so they can all do muffin tin Mondays). I totally lucked into the muffin tins, they are look like muffin top tins but they work for this and they were only a dollar each. The fabric for the apron was donated to me from my sister-in-law.


And some of the pictures of the kids decorating their cupcakes weren't intended to look like that. I just forgot the flash and then the battery died so I couldn't just take more pictures. (the problem when you use manual) So I had to lighten them as much as I could in Adobe Lightroom. I kinda like the look, they look like old grainy photos.