Just wanted to remind you that my blog moved and I have new and exciting things over there so come check me out :)
VoneInspired.com
Tuesday, November 20, 2012

Monday, July 16, 2012
How to start a new blog.
It's funny to think how much life can change in just 5 years. Things seem to move so fast these days that, to really appreciate how far we've come, you have to deliberately stop to every now and again to look at what's changed.
I just looked back and I can't believe I've had been writing a blog for over 5 years.
I think back to when I started and a lot has changed in that time. Back then, it seemed like everyone was blogging - or at least all of my friends. Not necessarily all crafty blogs, but posts about life, and kids, and family mixed with a heaving dose of rants on parenting and pop culture. I remember when one of my friends said that I should start a blog. But since I wasn't a writer like her, she suggested I should do a craft blog. I didn't even know that "craft blogs" were a thing at the time, but I thought "what the hell, I'll give it a try". And I soon discovered there was a whole world of people out there, writing about things they were doing, and sharing their projects and idea with the world.
And then Facebook came in our lives, and pretty quickly killed most of my friends blogs. With an easier, faster, and more direct way to share thoughts and photos, everyone gave up pretty quickly on blogging and stuck exclusively to Facebook. They still rant and joke, but in shorter mini-posts in the form of status updates instead. But my "How To" posts continued on. Give or take a few weeks off, here and there, I've posted 233 posts over the last 5 years - almost an average of 1 post per week over that time. And considering I've raised two daughters through their first five years, while working full time for most of those 5 years, 1 post a week is nothing to sneeze at.
I've really enjoyed the blog, and still love sharing all of my crafting adventures. But recently, I started to feel limited by the "How To" format and decided that I wanted to share more of what inspires me - not just the projects I'm doing. And then I realized that if I was going to change-up what I was posting about, that maybe it was time to really "shake the snow-globe" (as my husband likes to say) and re-design the entire site.
And so, I'm saying goodbye to my previous "How to .... do something" blog - and welcome to VoneInspired.com
Monday, June 18, 2012
Photo of the day June 11 - 18
More photos of the day for June

11. Door
When we moved in this screen door was in the garage, my husband fixed the screen and put it up. It looks great and lets air into the house.

12. From a low angle
This photo is actually from this past October when we biked to the CN tower.

13. Art
They finally put up hoarding around the ugly empty lot by our house and they put this pretty mural around it - so much nicer.

14. Time
Photo of the clock on the Fire Station down the street from us.

15. Yellow
I didn't realize the hydrants in our neighbourhood were yellow until I started looking for yellow things.

16. Out and about
Us girls went out Saturday morning to check out some garage sales.

17. In your bag
The only thing I bring when I drop Lilo off to school (photo actually taken on the 18th :)

18. Something we don't know about you
I love pickles, I probably eat 2-3 a day and more if they are the good kind.
How to teach the alphabet - the Letter K for Karate

K for karate chop.
After this project we had a lot of fun karate chopping each other. Isla had be so girly sometimes but likes to play rough too, best of both worlds.

She cut out the K and then drew out a head, hands and feet that I cut out and she glued them all down.

Then she added the belt and some extra stripes for details. It was a girl karate person so she added earrings on her drawing too, I guess you have to look pretty even when you fight.
Here are past letters
The Letter A for Alligator
The Letter B for Bubbles
The Letter C for Circles and Clown
The Letter D for Donut
The Letter E for Easter Eggs
The Letter F for Fairy
The Letter G for Glitter
The Letter H for Hands
The Letter I for Isla (daughter's name)
The Letter J for Jelly beans
Monday, June 11, 2012
Photo a day - June 7-10
A few more photos of June as part of the photo of a day in June.

7. Drink
This was actually from Saturday but tasty all the same.

8. Six O'clock
Dinner time

9. Your view today
We went to the Beach Arts and Craft fair on Saturday

10. Best bit of the weekend
On Sunday we checked out the drumming festival at Woodbine Park. The kids had a blast dancing to the music.
More photos to come - June is shaping up to be a fun month.
Thursday, June 07, 2012
Photo of the day for June

I came across this list of photo a day for June over at FatMumSlim and I thought it would be a fun way to get me taking more photos. I am having a little IPhone envy lately as Instagram looks very cool and would make this project a lot easier but instead I have my Nikon out and processing the pics in Lightroom (a awesome program for editing photos). And I have taken inspiration from Instagram when processing these photos and played around with them more then I usually do.

1. Morning
It was the first rainy day in a long time.

2. Empty
June 2nd was triathlon day. My daughter and husband did their first triathlon races. It was a long morning that deserved a good lunch and pint.

3. On your plate
I made S'more cupcakes.

4. Close up
Isla and I played with beads today

5. Sign
I love our neighbourhood.

6. Hat
This photo is a few years old when I was taking a photography course and had to take a self portrait.
I will try and post a few pictures every few days.
Monday, June 04, 2012
How to teach the alphabet - the Letter J for Jellybeans

Like every week we do a letter, we all brainstorm to come up with an idea Isla will like - picky girl. Anyway, of course she agreed to J for Jellybeans (I can see her already planning out the sampling as we make it.)
I had some left over Jellybeans from Christmas (could you tell) that weren't that great so they would be perfect for this.

We started like all of the letters, with me drawing it out and Isla cutting and glueing the letter to a piece of construction paper.

Then we dotted glue all over the J and she added jelly beans.

And more jelly beans. And then we went out to do some errands and let them dry.

Don't they look tasty.

And when we came home this is what we saw - blah. Gross, the jelly beans had dissolved in the glue. Not the look we were going for - J for Juicy jelly beans.

So out came the handy glue gun. We cut out a new J and glued it to a new piece of construction paper. I then put a dab of hot glue on the J and Isla stuck new jelly bean on it and we filled the J. Good thing she didn't eat all the left over jelly beans.
So now we have a J for Jellybeans and a mess.

Here are past letters
The Letter A for Alligator
The Letter B for Bubbles
The Letter C for Circles and Clown
The Letter D for Donut
The Letter E for Easter Eggs
The Letter F for Fairy
The Letter G for Glitter
The Letter H for Hands
The Letter I for Isla (daughter's name)
Sunday, June 03, 2012
How to make a Pretzel mix for Dad

Hubby's birthday was the other week and I was thinking of crafts for the kids to make. I wanted something that he would really enjoy and was different then past presents. He loves snack mixes and thought it would be fun for the kids to pick out all the ingredients.

So I took a trip to the Bulk Barn with the kids and we picked out a yummy collection for our mix: waffle pretzels, pretzel nuggets, sesame sticks, salted peanuts, salted almonds, cashews, chocolate rosebuds and M&Ms.
When we got home we put all the ingredients into a big bowl and mixed it all up. Then scooped it into a large jar that I got from the dollar store. We had some extra so we poison tested it (you know we couldn't give it to Dad if it didn't taste good, right?).
Lilo then helped me decorate the jar with curling ribbon. She was proud of herself for learning to curl the ribbon.
I forgot to take a picture before we gave it to him which is why it's not full. He loved it and it was gone pretty fast, I think it was a win.

He also got a painted shirt from Isla. It was a freezer paper stencil like Lilo made for him last year for his birthday. I really liked how it turned out.
The process was a little challenging because for some reason kids never want to colour on demand. I kept trying to get Isla to draw a picture for Dad but she would just scribble something. Finally I thought of just having her cut out shapes to put on a circle to be a soccer ball - much easier to cut out then little thin lines and scribbles.
After the picture was done I traced the image out onto the freezer paper and cut it out with an x-acto knife and ironed it on to the tee. Then I used white fabric paint and painted a few coats. I pulled off the stencil once it was dry and ironed the back of the shirt to set it. And voila, a new shirt for Dad.
And don't be fooled by the photo, he's not usually so serious :)
Sunday, May 27, 2012
How to make sandwich-less lunches
So a few months ago Lilo told me that she no longer liked sandwiches, or that she only liked peanut butter sandwiches. Since she can't bring nuts to school that wasn't going to work. I tried to convince her that sandwiches were ok but after a week untouched sandwiches left in her lunchbox I went a different route.
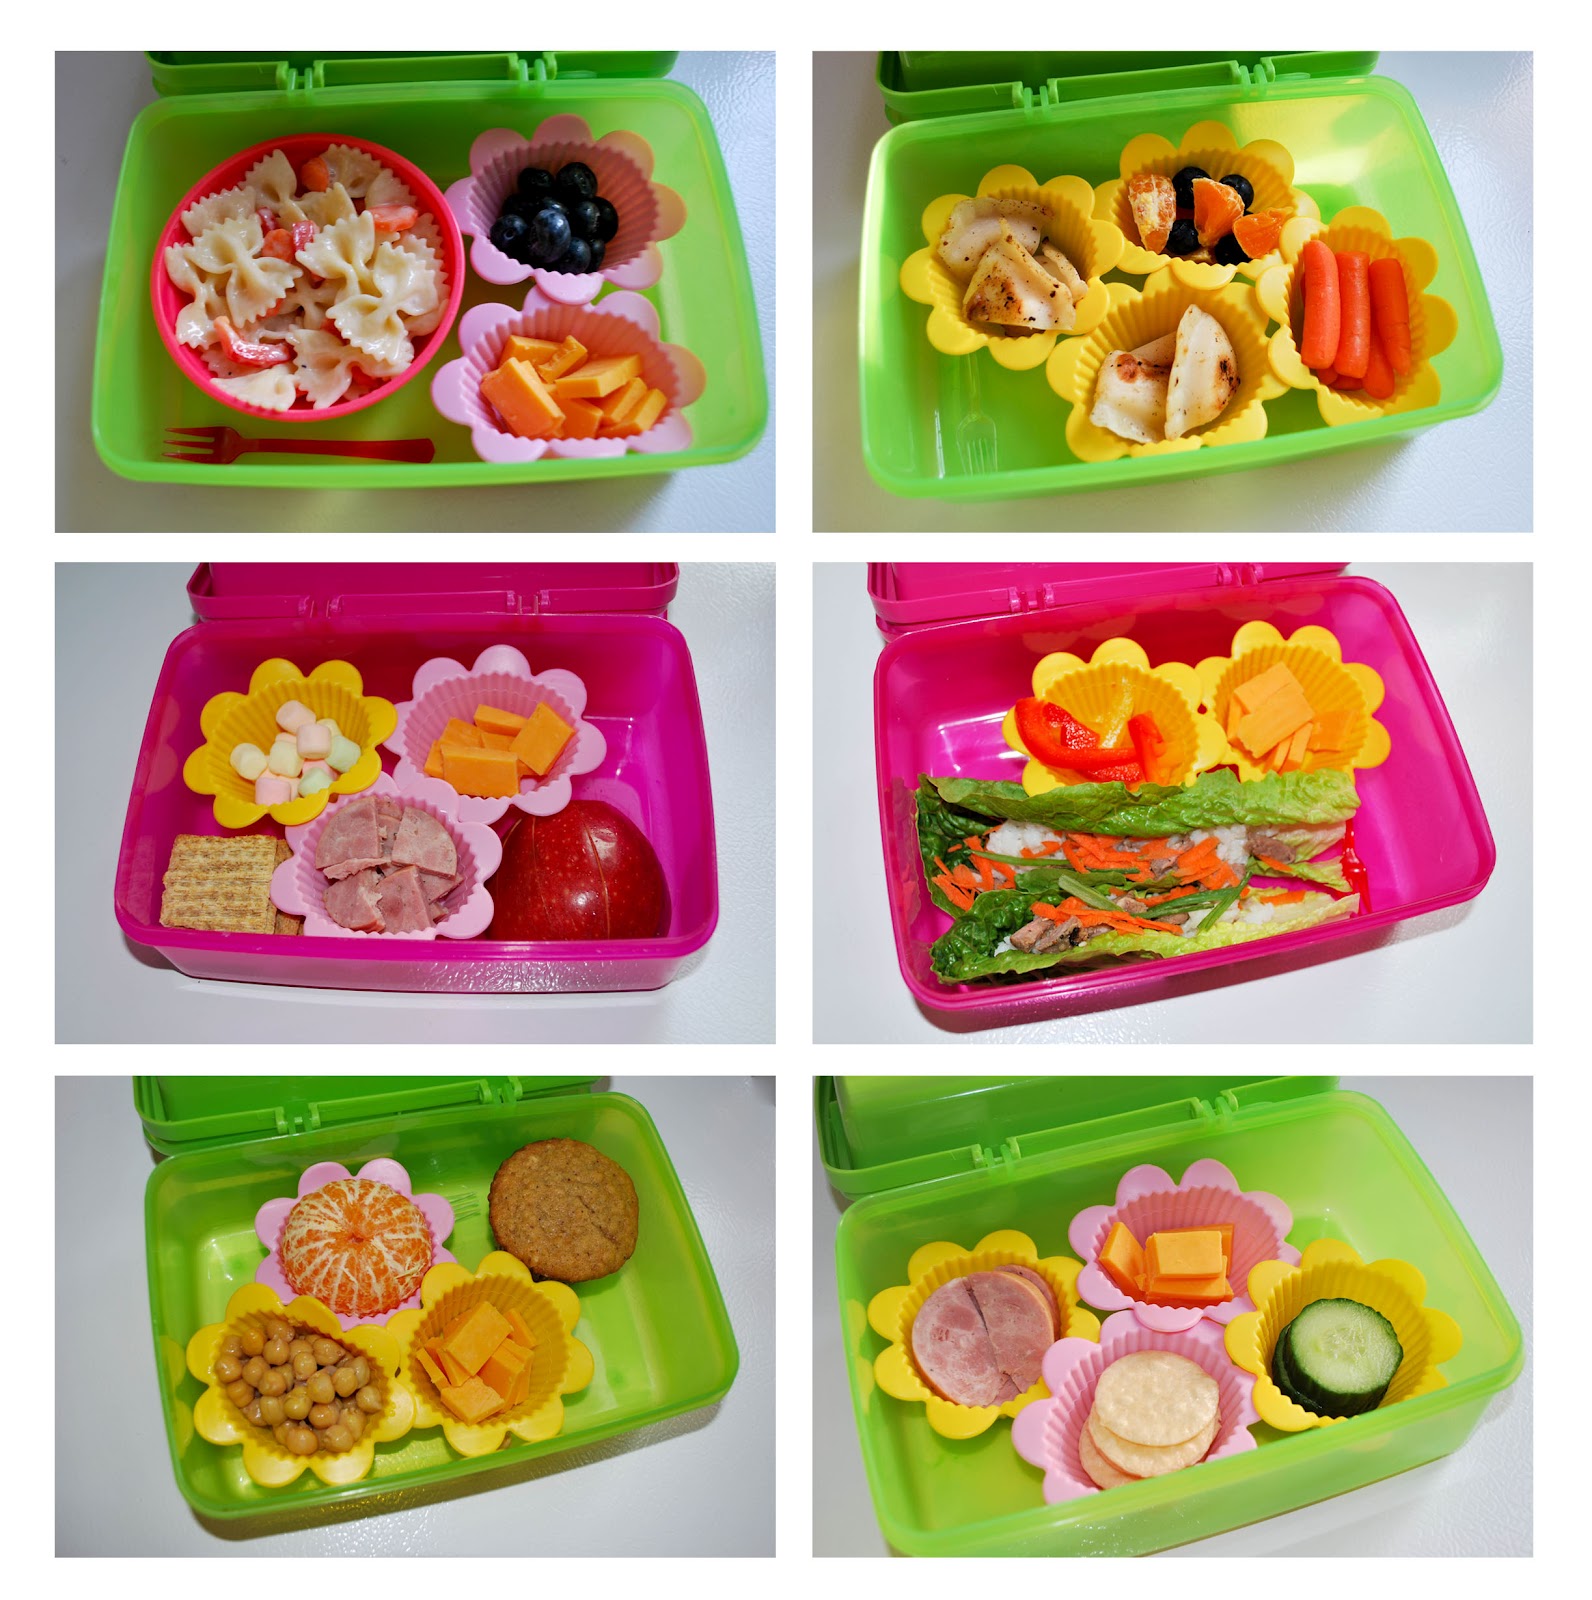
So here are some examples of lunches I have made for her.
1. Pasta salad (left over pasta with some carrots, peppers and her fav. caeser dressing), blueberries and cheddar cheese.
2. Left over peorgies, blueberries and oranges, carrots
3. Half of apple, triscuits crackers, keilbasa sausage, cheddar cheese, mini marshmallows
4. Left over lettuce wraps - rice, beef and carrots in romain leaves, cheddar cheese, red peppers
5. Chick peas, orange, cheddar cheese and oatmeal muffin
6. Rice crackers, keilbasa sausage, cheddar cheese and cucumber slices
The lunch box also has a top with a spot for a drink and 2 snacks.
She usually gets an apple juice and snacks are sometimes easy granola bars and fruit snacks, but also cransins and raisins, grapes, carrots, cheese or graham crackers.

I got the silcone muffin cups from an exchange a did a few years back and they fit perfectly, I also like to include a mini cocktail fork - it's cute and fits nicely.
So I hope I've inspired some people to mix it up for the last month of school.
What are your kid's favourite school lunches?
Wednesday, May 23, 2012
How to make a mini photo book from an old greeting card

Isla has recently found Lilo's baby photo book and has been bringing it around with her and showing it to everyone - I had to remove the one bum photo since of course she showed that one first. Anyway, I thought it would be good to make her a new photo book with actual photos of her and no bums.
So with the left over photos that we printed from the Letter I craft we made a photo album for Isla.

I made the book from an old greeting card. I covered the inside of the card with coloured paper. Then I cut white paper to fit inside and folded them in half. I stapled the edges and then glued them in the seam and let dry. Once dry I trimmed the edges so it fit into a book better. I had actually made this before I decided to make it into a photo book, it was just a note book at this point but once I got the idea of the photo book this was the perfect size.
So as I said up above I used the extra photos we printed and cut them out and glued them into the book. Isla wrote her name in the front and there we go, a cute little photo book (oh and she's figured out how to write the S now).
It reminds me of a conversation we had awhile ago. We met a baby named Isla which she thought was pretty cool. After they left she asked me "Do you like the name Isla?", I said "Yes, do you?", she said, "Not so much, the S is hard."

The idea to make a book from a greeting card actually came from Isla - she made one first and then I copied her. Kids have the best ideas. And thanks to all the friends that I worked with that donated their old holiday cards to our crafting stash, they have been well used.
Wednesday, May 16, 2012
How to teach the Alphabet - the letter I for Isla

Since my little girl's name starts with "I" it only made sense to do I for Isla (pronounced Eye-la).

First she sat with me and we looked through a bunch of photos on the computer of her and she picked a bunch for us to print. I selected all the photos to print and then selected to print a contact sheet of them but they seemed a bit small so I also printed a wallet size sheet (9 photos per sheet) of them as well.

After cutting them all out she placed them on a sheet of paper so we could see how many we could fit. She also cut out the red I to put on after the pictures were glued down.

She first glued down the large photos and then the I.

After she filled in spots with the small photos, that way we got all the pictured on.
I loved how it turned out, lots of bright coloured pictured and big smiles. We made another great craft with the extra photos - I promise to share soon.

The Letter A for Alligator
The Letter B for Bubbles
The Letter C for Circles and Clown
The Letter D for Donut
The Letter E for Easter Eggs
The Letter F for Fairy
The Letter G for Glitter
The Letter H for Hands
Tuesday, May 01, 2012
How to make a tee with a kids drawing.

At the last minute I realized that Lilo hadn't made anything for Isla for her birthday. So quick thinking Mom came up with this idea to have her draw a picture and I attach it to tee and voila a great gift.

I took a piece of white knit jersey and ironed on some Heat n' Bond to the back and cut it into 2 pieces. I gave them to Lilo with some fabric markers that I got at the dollar store. I gave her 2 pieces so there was no stress if one doesn't turn out. The paper back of the Heat n' Bond made the fabric more stable for her to draw on, but I did forget to tell her which side to draw on so the first attempt was on the paper backing.

When she was done with the drawing I removed the backing and I ironed it on to a spare blank tee I had.
Then I sewed 2 rows of straight stitch around the whole square about 1/8" inch from the edge.

I added a boarder to the image with a wide piece of rick rack. The corners I just folded the trim over and sewed on the other side of the trim since there is no true right and wrong side.
And done. Fast, easy and super cute.

She was super happy to open the present and has worn it a few times already. She is very proud to tell everyone that her sister and Mom made it for her.
Subscribe to:
Posts (Atom)


