Showing posts with label decor. Show all posts

Wednesday, April 11, 2012

How to make a spring vase from a milk carton


We went to a friend's house for Easter dinner and the girls and I thought it would be nice to bring her some flowers.

What you need:
small milk or cream carton (1 litre)
2 shades of green construction paper
glue
other colour paper and/or stickers
water & flowers


First I cut the top of the milk carton off (and saved for another project). Then put the carton on your first piece of green paper - I then cut out the paper 1" or so taller then the carton. I cut pointy grass edge on the top of the paper. 


Glue the paper and wrap around the carton and crease the edges so they fit around nice. 


I then cut out strips of the other green tone to make blades of grass and then we glued them on.


I used small flower punches to cut out a bunch of flowers in different colours and the girls glued them on. I had originally pulled out some printed paper to use to decorate but we liked the look of the little flowers better.


Now just fill with water and flowers. 


I was hoping to get tulips that were more open but we waited till the last minute to buy them (almost forgot) so the selection wasn't great - I guess we weren't the only ones who bought flowers this Easter weekend. But I'm sure they are lovely now.

Saturday, March 03, 2012

How to make cute kids rooms


 Isla's Room
I thought I'd share the girls rooms with you. I love decorating kids rooms - well I really love painting something fun on the walls. As my husband says, "Why buy one can of paint when 5 will do".
My hubby wasn't really on my side when I first started painting Isla's room, I don't believe I explained my vision very well, but in the end he liked it and more importantly Isla does.

I started by painting the room all white and then used a chalk line to create the lines and taped the white off. It was a pain but worth it, seriously painting stripes on the ceiling was annoying.


The bed is a double futon so it acts as a spare bed when people visit and Isla bunks in her sisters room. But since there is lots of room on her bed she has at least a dozen stuffed animals that sleep with her every night. The cats also like it.


On one wall we framed some Keith Herring photos, they are Ikea frames and the pictures are from an old calendar. Easy, cheap art. I love art calendars. My mom bought us a fun one this year too that would look great in the kids room.

I did one of those melted crayon art that have been all over Pinterest.
They are fun, easy, colourful. Just glued crayons on a canvas with a glue gun and then used a hair dryer to melt the crayons and let them drip.

Lilos' Room


Lilo's room was fun to do. I bought her a duvet cover years ago when I was travelling for work in Hong Kong. It has little houses, trees, animals and hearts on it. Instead of buying a duvet to put in it I just bought an inexpensive comforter to put inside. It works well and is nice and lightweight.

So inspired by a photo I saw, I thought it would be fun to paint a tree on the wall and add little birdhouses.


The birdhouses are from the dollar store and then Lilo and I painted them. I also painted the ceiling sky blue and the baseboard a green for grass. The ceiling paint I carried down in a scallop pattern. I cut out the scallop pattern on a piece of cardboard - about 2-3 scallops and then put the flat edge of the cardboard against the ceiling and with a pencil traced the scallop pattern all around the room. I then hand painted the scallop design.


To hang up the birdhouses I drilled a hole in the back of the birdhouse and put a screw in the wall and hang the birdhouses up. 


|The bed and dresser were my sister-in-laws childhood furniture which was originally a yellowy pine colour, after many coats of paint they are now white. The wardrobe is just from Ikea since her room doesn't have a closet.


This dresser is also from Ikea, it was an old dresser we bought 2nd hand from a friend about 10 years ago. It was a burgundy colour so I gave it a new life by painting it white and the drawers pretty colours from the room and added new hardware. I love it now.
There is a also a clothesline in her room to hang up her art.

It's funny how the kids rooms are all done but our bedroom still hasn't been painted. Oh well, I guess that's pretty normal. 
Sunday, December 04, 2011

How to make a glitzy wreath


Here's the new wreath I made last year for our backdoor. 
I started with a wire hanger and bent it into a circle.


Then I wrapped the wire with newspaper and taped it around. I took sheets of newspaper and crumpled it  into long tubes and then formed around the wire and taped it in place, then I added more until it was thick enough. I then taped all around to smooth it out. I spray painted the wreath white. And now you have a free wreath form.
Then I put all the Christmas crap I had bought on the table to figure out what to use. It's a combination of dollar store stuff and decorations that I bought at a sample sale - stuff like 1 strand of garland that's not enough to decorate a tree or anything.

I chose the garland to start with, since I only had 1 strand of 3 different kinds I had to spread them out and layer them. After I got all the garland on I added a big bow and some dollar store decorations.


Wednesday, February 02, 2011

How to paint a pirate ship mural

My nephew asked for a pirate mural for Christmas from me, I was very flattered. My sister-in-law sent me the drawing he did and gave me a few key words of what he was wanting: Jolly Roger flag, cannon with a pile of balls and a parrot.

So I took his ideas and came up with this picture below which is what I actually wrapped for Christmas for him. This past weekend we got back to their place to start working on the actual mural.


In 2 days I got a good chunk finished, the pirate ship is done which is phase 1. Next visit will be phase 2; the pirate, parrot, cannon, balls and port holes. But I must say I'm pretty excited about how it's coming. I love that the image in my head looks the same as the one on the wall.

I first prepped the wall. Removed the red tape on the stripe and sanded the road (left from previous decor). I then primed the stripe.
To help draw out the image on the wall I took my picture I drew into photoshop and added 1 foot grid lines. On the wall I marked off 1 foot intervals on the sides. Then drew out the base of the ship.
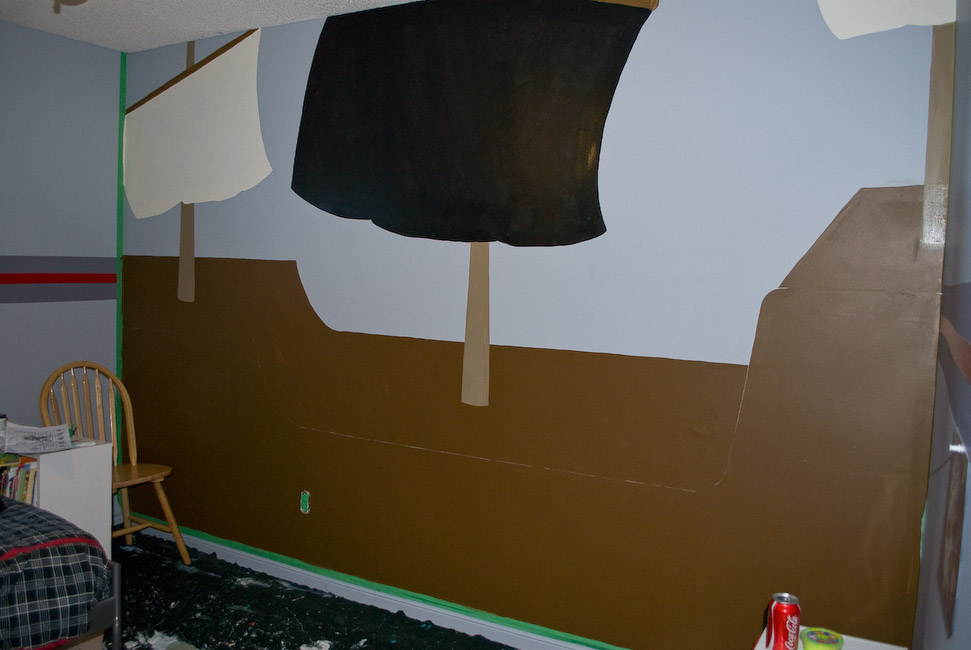
I painted brown on the ship. Since I had drew out the outline of the ship I tried to keep the lines when I painted the brown so I wouldn't have to re-draw it. I also painted the base grey colour on the part of the stripe that I primed.
I drew in the on the flags and posts again referring back to my drawing with the grid lines. I decided to paint the main Jolly Roger sail in black instead of white, just to look more piratey and it matches back to his black comforter.

Then next day I went to the details. Inspired by the 90s Debbie Travis, I found a wood grainer tool and made the ship look like real wood - so cool. It was easy to use. I mixed a darker brown colour and mixed it 1 part paint to 4 parts glaze. I rolled the glazed paint in small section and then pulled the wood graining tool across, rocking in as I pulled and it left this cool wood grain. The hardest part was staying straight - but since the glaze stays wet you can try again.
I used a projector to trace out the Jolly Roger, then painted a few coats of white. Then I added detail to the posts and the sails. I added highlights and shadows to the ship and I used a sharpie to outline - which easier to use a marker then a paint brush.
Here's a little cousin love, aren't they cute.
Ian's liking the mural - it's bigger than he thought, but I think if you're going to paint a mural then why paint it small. I'm not a fan of dinky mural, I say just go for it.

I will post phase 2 once in the future.

Saturday, March 20, 2010

How to make pinwheels

Since I'm now working full time it's really cutting into my crafting and blogging time. So I thought I'd pull something that I did in the summer and didn't post - plus with this beautiful spring weather we've been having I thought it would be cute. (I started writing this when the weather was still warm - today it was snowing a bit so I guess spring isn't quite here yet.)

At the end of the summer last year I made these for decorations for a weekend bbq. The kids thought they were fun even if the wind just turned the pencils in the vases verses actually spinning the pinwheels.

I got the tutorial on ohdeedoh. Look there for the full tutorial - I'll just brief over what I did. First do not to use heavy weight scrapbooking paper - I had this pretty heavier paper that was printed on both sides but it didn't want to bend very well for this project. I used plain scrapbooking paper cut into 5"x5" squares. Then folded in half in a triangle and then folded the other way and cut up the fold line half way. I found it easiest to pre-prick the holes on the tips so it went together easier. I used pins from the dollar store (that aren't good for anything else) and cut them down to about 1/2" or maybe less. I pulled the 4 corners together with the pin and through the centre and then I used a small seed bead as a spacer before I stuck the pin into the eraser of the pencil. The spacer just helps it to spin. I also put a dab of glue on the end of the pin in hopes that they would stay in place. They didn't stay together but I think they held up a bit longer because of this.


I had a bunch of coloured pencils - which actually say "Vone's pencil HANDS OFF!!!" on them from my sister-in-law that I used. She got them for me because I complained that I could never find anything with my name on it as a child so that Christmas I got 3-4 things with my name on them.
I put them in Vodka shot glasses. I don't think we've ever used them for vodka and they are pretty big for a regular shot so they've mostly been used for small flowers and decorations.

Pinwheels would be fun to make with the kids for the windy spring weather.

Tuesday, March 02, 2010

How to paint your kitchen backsplash

Here's another room makeover we did to update our house.
The before picture looks better than it was since I had already taken down the country boarder and my husband had fixed the hole in the ceiling from a leaking pipe already.

It's amazing what a difference painting the back splash was - and removing all the clutter. I also made new curtains and my husband spray painted the stove hood so it blended in better (not the aged beige that it was).
We had some extra kitchen tiles so I made up a few samples first. I wish I had taken a photo of the finished tiles. I did one with lots of texture, a little, none and one white base. It was good to get other people opinion and to try it out different techniques first.
First I cleaned the back splash well with TSP. Then taped it off for painting. I primed the tiles with a foam roller, a nice even coat of good primer - stuff that said it was good for glossy surfaces.
Next again using a foam roller painted on the base coat - which was 2 shades darker than the walls.
Now to add texture. I mixed up glaze with the wall colour, as well as the lighter trim colour for variation. Plus I had some base colour to mix with too to add depth.
I used a sea sponge, a foam brush, a thin artist brush and a bunch of clean rags to get the look I wanted.

I started by using the lightest colour (glaze/paint mix) and tapped it in the grout lines with the foam brush.
Then wiped off the tiles, trying to leave the paint in the grout.
Then using a variety of the 3 colour of paint, I sponged them on the tiles.
And then using a tapping motion removed most of it with a clean dry rag.
Then using an artist brush I added more paint in the grout and wiped off any extra.

I put 2 coats of polyurethane over top to seal it all in and give it a bit of a gloss.
I think it looks amazing. You wouldn't guess it was painted. I think the key is to spend the time on the grout. This wasn't a fast project but it was well worth it since it's updated the dated kitchen so much.

If we were staying we were thinking of painting the cabinets as well but at least the horrible tiles are covered up. We only wished we had done this sooner. Since I already had the primer and glaze, the project cost only $30.
It also seems like it should last a while as long as you don't scratch it too much (which you don't do much of on a back splash). Since it's coated with polyurethane it wipes up easy too. And really even if it chipped a bit it would still look better than it did. I think the key is making sure it dries well in between coats and adding at least 2 coats of polyurethane.