Showing posts with label kids. Show all posts

Monday, June 18, 2012

How to teach the alphabet - the Letter K for Karate


K for karate chop.
After this project we had a lot of fun karate chopping each other. Isla had be so girly sometimes but likes to play rough too, best of both worlds.


She cut out the K and then drew out a head, hands and feet that I cut out and she glued them all down.


Then she added the belt and some extra stripes for details. It was a girl karate person so she added earrings on her drawing too, I guess you have to look pretty even when you fight.


Here are past letters
The Letter A for Alligator
The Letter B for Bubbles
The Letter C for Circles and Clown
The Letter D for Donut
The Letter E for Easter Eggs
The Letter F for Fairy
The Letter G for Glitter
The Letter H for Hands
The Letter I for Isla (daughter's name)
The Letter J for Jelly beans


Monday, June 04, 2012

How to teach the alphabet - the Letter J for Jellybeans


Like every week we do a letter, we all brainstorm to come up with an idea Isla will like - picky girl. Anyway, of course she agreed to J for Jellybeans (I can see her already planning out the sampling as we make it.) 
I had some left over Jellybeans from Christmas (could you tell) that weren't that great so they would be perfect for this.


We started like all of the letters, with me drawing it out and Isla cutting and glueing the letter to a piece of construction paper.


Then we dotted glue all over the J and she added jelly beans.


And more jelly beans. And then we went out to do some errands and let them dry.


Don't they look tasty. 


And when we came home this is what we saw - blah. Gross, the jelly beans had dissolved in the glue. Not the look we were going for - J for Juicy jelly beans.


So out came the handy glue gun. We cut out a new J and glued it to a new piece of construction paper. I then put a dab of hot glue on the J and Isla stuck new jelly bean on it and we filled the J. Good thing she didn't eat all the left over jelly beans.


So now we have a J for Jellybeans and a mess.
Here are past letters
The Letter A for Alligator
The Letter B for Bubbles
The Letter C for Circles and Clown
The Letter D for Donut
The Letter E for Easter Eggs
The Letter F for Fairy
The Letter G for Glitter
The Letter H for Hands
The Letter I for Isla (daughter's name)


Sunday, June 03, 2012

How to make a Pretzel mix for Dad


Hubby's birthday was the other week and I was thinking of crafts for the kids to make. I wanted something that he would really enjoy and was different then past presents. He loves snack mixes and thought it would be fun for the kids to pick out all the ingredients. 


So I took a trip to the Bulk Barn with the kids and we picked out a yummy collection for our mix: waffle pretzels, pretzel nuggets, sesame sticks, salted peanuts, salted almonds, cashews, chocolate rosebuds and M&Ms. 
When we got home we put all the ingredients into a big bowl and mixed it all up. Then scooped it into a large jar that I got from the dollar store. We had some extra so we poison tested it (you know we couldn't give it to Dad if it didn't taste good, right?).
Lilo then helped me decorate the jar with curling ribbon. She was proud of herself for learning to curl the ribbon. 
I forgot to take a picture before we gave it to him which is why it's not full. He loved it and it was gone pretty fast, I think it was a win.


He also got a painted shirt from Isla. It was a freezer paper stencil like Lilo made for him last year for his birthday. I really liked how it turned out. 
The process was a little challenging because for some reason kids never want to colour on demand. I kept trying to get Isla to draw a picture for Dad but she would just scribble something. Finally I thought of just having her cut out shapes to put on a circle to be a soccer ball - much easier to cut out then little thin lines and scribbles. 
After the picture was done I traced the image out onto the freezer paper and cut it out with an x-acto knife and ironed it on to the tee. Then I used white fabric paint and painted a few coats. I pulled off the stencil once it was dry and ironed the back of the shirt to set it. And voila, a new shirt for Dad.
And don't be fooled by the photo, he's not usually so serious :)

Sunday, May 27, 2012

How to make sandwich-less lunches


So a few months ago Lilo told me that she no longer liked sandwiches, or that she only liked peanut butter sandwiches. Since she can't bring nuts to school that wasn't going to work. I tried to convince her that sandwiches were ok but after a week untouched sandwiches left in her lunchbox I went a different route. 

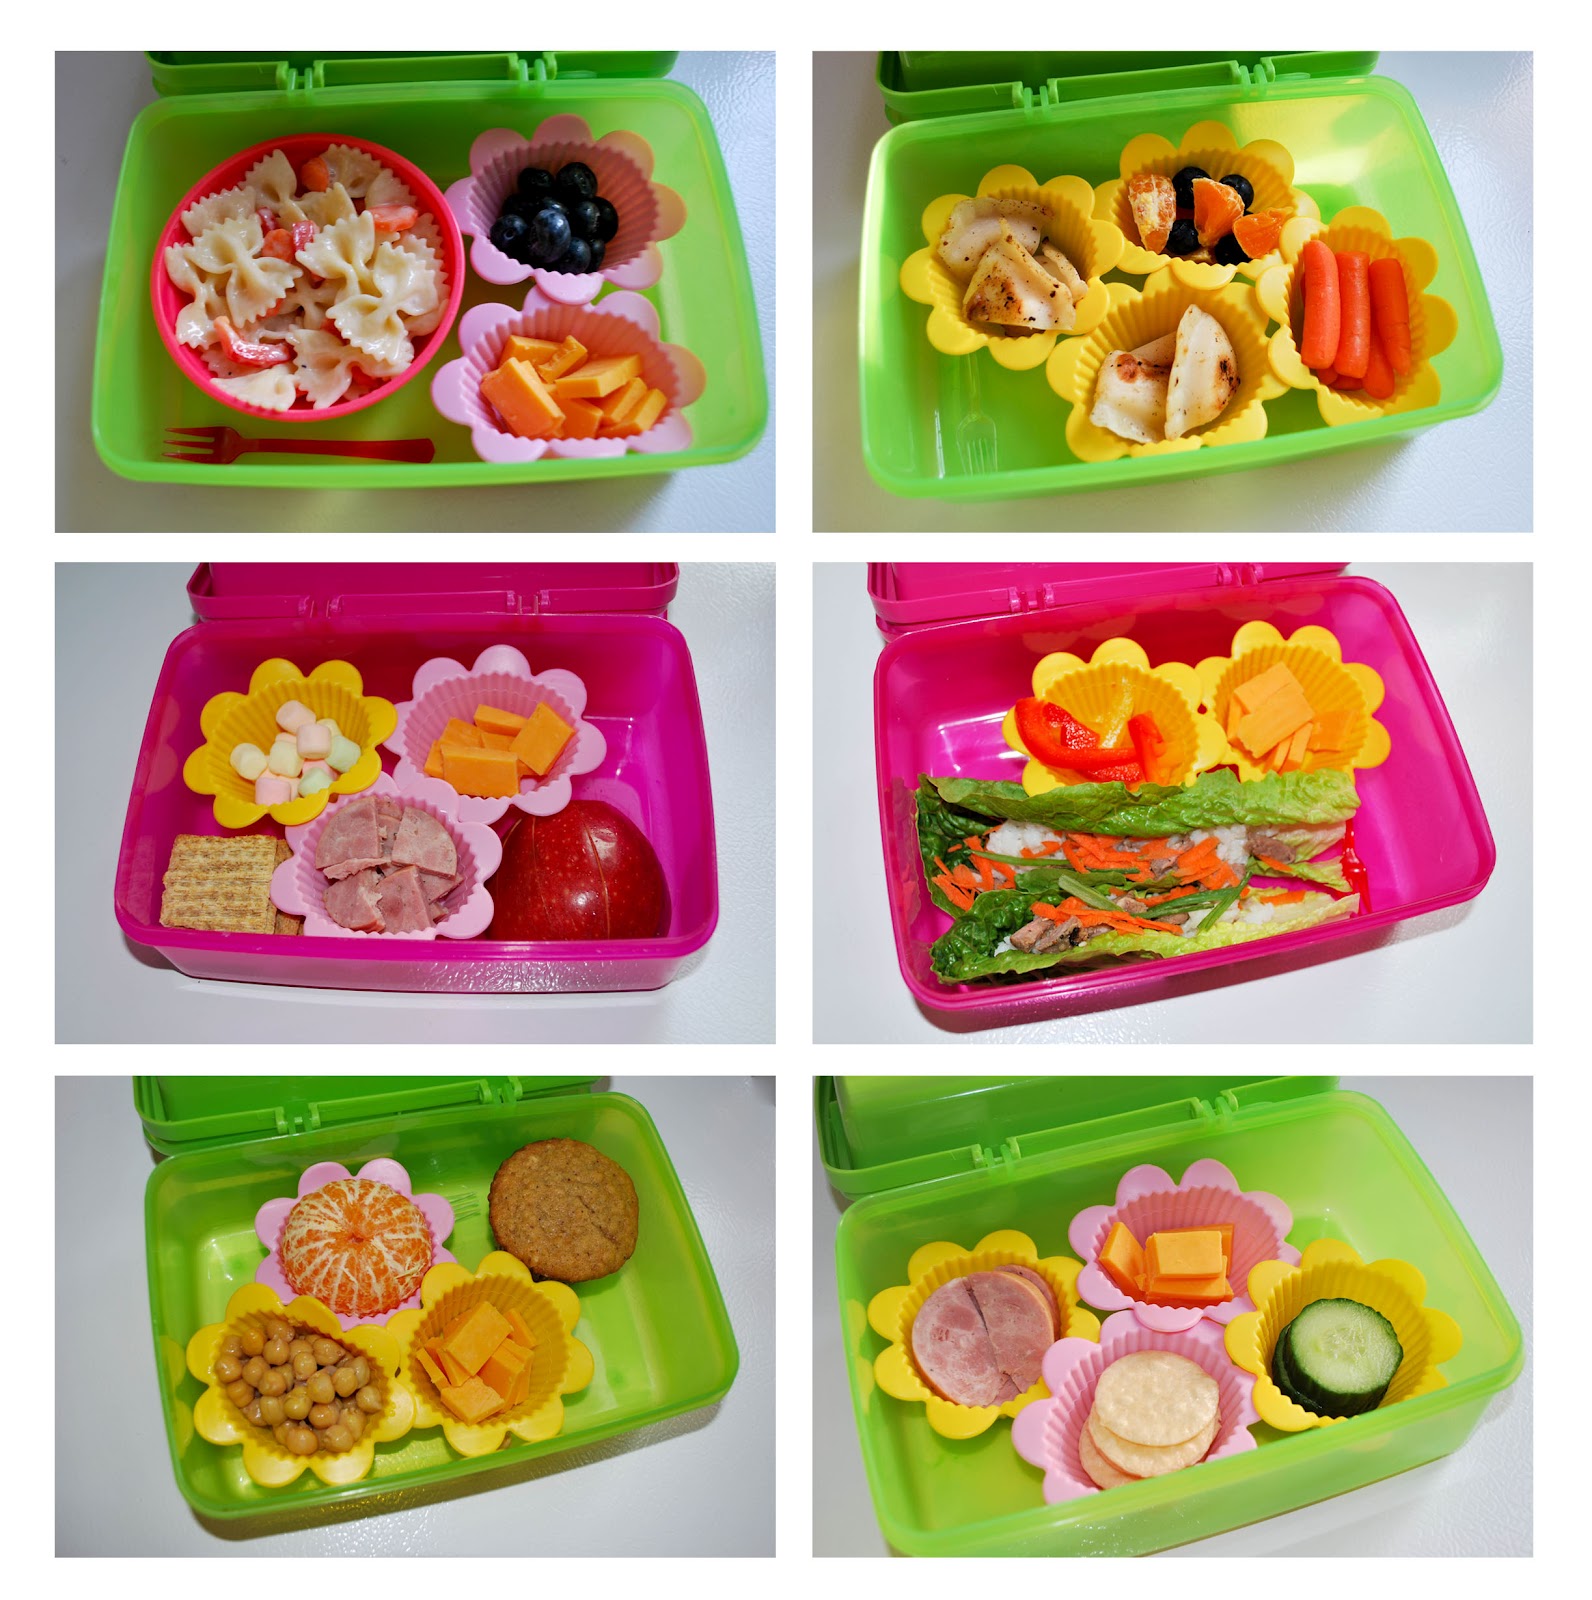
So here are some examples of lunches I have made for her.
1. Pasta salad (left over pasta with some carrots, peppers and her fav. caeser dressing), blueberries and cheddar cheese.
2. Left over peorgies, blueberries and oranges, carrots
3. Half of apple, triscuits crackers, keilbasa sausage, cheddar cheese, mini marshmallows
4. Left over lettuce wraps - rice, beef and carrots in romain leaves, cheddar cheese, red peppers
5. Chick peas, orange, cheddar cheese and oatmeal muffin
6. Rice crackers, keilbasa sausage, cheddar cheese and cucumber slices

The lunch box also has a top with a spot for a drink and 2 snacks.
She usually gets an apple juice and snacks are sometimes easy granola bars and fruit snacks, but also cransins and raisins, grapes, carrots, cheese or graham crackers.
I got the silcone muffin cups from an exchange a did a few years back and they fit perfectly, I also like to include a mini cocktail fork - it's cute and fits nicely.

So I hope I've inspired some people to mix it up for the last month of school. 
What are your kid's favourite school lunches?

Wednesday, May 23, 2012

How to make a mini photo book from an old greeting card

Isla has recently found Lilo's baby photo book and has been bringing it around with her and showing it to everyone - I had to remove the one bum photo since of course she showed that one first. Anyway, I thought it would be good to make her a new photo book with actual photos of her and no bums.
So with the left over photos that we printed from the Letter I craft we made a photo album for Isla. 


I made the book from an old greeting card. I covered the inside of the card with coloured paper. Then I cut white paper to fit inside and folded them in half. I stapled the edges and then glued them in the seam and let dry. Once dry I trimmed the edges so it fit into a book better. I had actually made this before I decided to make it into a photo book, it was just a note book at this point but once I got the idea of the photo book this was the perfect size.
So as I said up above I used the extra photos we printed and cut them out and glued them into the book. Isla wrote her name in the front and there we go, a cute little photo book (oh and she's figured out how to write the S now). 
It reminds me of a conversation we had awhile ago. We met a baby named Isla which she thought was pretty cool. After they left she asked me "Do you like the name Isla?", I said "Yes, do you?", she said, "Not so much, the S is hard."


The idea to make a book from a greeting card actually came from Isla - she made one first and then I copied her. Kids have the best ideas. And thanks to all the friends that I worked with that donated their old holiday cards to our crafting stash, they have been well used. 

Wednesday, May 16, 2012

How to teach the Alphabet - the letter I for Isla


Since my little girl's name starts with "I" it only made sense to do I for Isla (pronounced Eye-la). 


First she sat with me and we looked through a bunch of photos on the computer of her and she picked a bunch for us to print. I selected all the photos to print and then selected to print a contact sheet of them but they seemed a bit small so I also printed a wallet size sheet (9 photos per sheet) of them as well.


After cutting them all out she placed them on a sheet of paper so we could see how many we could fit. She also cut out the red I to put on after the pictures were glued down.


She first glued down the large photos and then the I.


After she filled in spots with the small photos, that way we got all the pictured on.


I loved how it turned out, lots of bright coloured pictured and big smiles. We made another great craft with the extra photos - I promise to share soon.


The Letter A for Alligator
The Letter B for Bubbles
The Letter C for Circles and Clown
The Letter D for Donut
The Letter E for Easter Eggs
The Letter F for Fairy
The Letter G for Glitter
The Letter H for Hands


Tuesday, May 01, 2012

How to make a tee with a kids drawing.


At the last minute I realized that Lilo hadn't made anything for Isla for her birthday. So quick thinking Mom came up with this idea to have her draw a picture and I attach it to tee and voila a great gift.


I took a piece of white knit jersey and ironed on some Heat n' Bond to the back and cut it into 2 pieces. I gave them to Lilo with some fabric markers that I got at the dollar store. I gave her 2 pieces so there was no stress if one doesn't turn out. The paper back of the Heat n' Bond made the fabric more stable for her to draw on, but I did forget to tell her which side to draw on so the first attempt was on the paper backing.


When she was done with the drawing I removed the backing and I ironed it on to a spare blank tee I had.
Then I sewed 2 rows of straight stitch around the whole square about 1/8" inch from the edge.


I added a boarder to the image with a wide piece of rick rack. The corners I just folded the trim over and sewed on the other side of the trim since there is no true right and wrong side.


And done. Fast, easy and super cute.


She was super happy to open the present and has worn it a few times already. She is very proud to tell everyone that her sister and Mom made it for her.

Saturday, April 28, 2012

How to teach the Alphabet - the Letter H for Hands


My older daughter Lilo has been very interested in our letter crafts. She even took out an alphabet board book from her school library to give us for inspiration. Hands for H was her idea. I'm usually not a fan of what I call "messy paints" but once and awhile I give in.


When Isla and I were out a few weeks ago and we were sitting by a glass wall that had a red advertisement on it, she was looking through it at the cars driving by and said "hey, look, a purple car". I thought that seems weird so we looked over the wall and saw that it was just a blue car that looked purple because of the red wall. We had fun looking at what colours the red wall made things look. 
And so since we were recently talking about mixing colours I thought this would be a fun way to see how you can make other colours from red, yellow and blue. 


So she put one had in red and one in blue, rubbed them together and made purple.


One hand red and one hand yellow, squish together - you get orange.


Stamp them on white paper.


Blue and yellow smooshed together make green.


She had lots of fun making hand prints.


And free form finger/hand painting and she wanted to see what white did to colours too at this point.


And just painting her hands and arms. We went through a lot of paper that day and have a big clean up but it wasn't too bad. The table cloth is plastic, she had a painting shirt on and the bit that got on her clothes underneath washed out. And a big scrub in the sink and her arms returned to their natural colour.


Somewhere along the way she printed her hands on the letter H that I had traced on to a piece of paper and then she cut it out and glued on to another piece of paper.


The Letter A for Alligator
The Letter B for Bubbles
The Letter C for Circles and Clown
The Letter D for Donut
The Letter E for Easter Eggs
The Letter F for Fairy
The Letter G for Glitter


Thursday, April 26, 2012

How to make a town from recycled boxes


The other week we finally decided to do something with all the boxes we have been saving and made a mini town with them. It was a fun activity that took a few days to do and it's actually still not 100% finished so I'm sure we will keep adding to it. 
Here's how you can make your own.


Supplies:
- lots of boxes; crackers, cereal, milk cartons, etc.
- primer
- paint brushes and rollers
- tape
- paints
- markers
- toilet paper rolls
- construction paper
- stickers


First we taped up all the boxes. 


Then we primed the boxes with rollers, 


and brushes. I have an old drop cloth (a shower curtain) we used under to save the table and wore painting t-shirts.


Here are all our boxes drying.


Then I set them up on the hutch to see how they would all look together.


Now comes the painting. I had a few bottles of bright coloured acrylic paint and thought they would be fun to use.


After 2 coats of paint, they look great.


I then thought the town needed some trees.  First I made a big pine tree from a paper towel tube and 2 tone green construction paper. 


I cut some wedge shaped pieces and rolled them around a crayon to give them some volume.  


And here`s the cute tree.


The top is a circle wrapped into a cone with little curls on it.


Then we made smaller trees. Cut toilet paper rolls and add slits on the sides. I cut tree top shape and added stickers to make an apple tree and flower bush.


With the boxes we added windows and doors and named some of the towers.


I cut squares out of white paper and we glued them on for windows and permanent markers to add details.


I cut out the doors with an xacto knife and added a handle by putting a small piece of pipecleaner through the door so it can easily be opened and closed.


As we were making the town the girls asked why we were doing this, as it who`s going to live here. I thought the girls mini Lalaloopsy`s would be a great fit. And they are, each girl has their own building to live in.


Isla thought the girls needed sleds, so I made a few for them to race in.

It was a lot of fun to make and play with. It`s always fun when a craft can be used. 
It`s funny while I make things with the girls I have to remember to let go and that it doesn`t need to be perfect. Lilo reminded me of that while we were putting the windows on the houses, ``Mom, it`s our craft``.
So I backed off and let them do their thing and they love it.
And the other bonus of this project as it was free, I didn`t have to buy anything for it.