
Here's another room makeover we did to update our house.
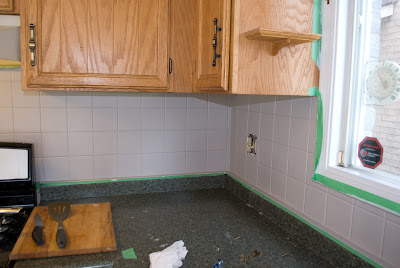
 The before picture looks better than it was since I had already taken down the country boarder and my husband had fixed the hole in the ceiling from a leaking pipe already.
 It's amazing what a difference painting the back splash was - and removing all the clutter. I also made new curtains and my husband spray painted the stove hood so it blended in better (not the aged beige that it was).
 We had some extra kitchen tiles so I made up a few samples first. I wish I had taken a photo of the finished tiles. I did one with lots of texture, a little, none and one white base. It was good to get other people opinion and to try it out different techniques first.
 First I cleaned the back splash well with TSP. Then taped it off for painting. I primed the tiles with a foam roller, a nice even coat of good primer - stuff that said it was good for glossy surfaces.
 Next again using a foam roller painted on the base coat - which was 2 shades darker than the walls.
 Now to add texture. I mixed up glaze with the wall colour, as well as the lighter trim colour for variation. Plus I had some base colour to mix with too to add depth.
I used a sea sponge, a foam brush, a thin artist brush and a bunch of clean rags to get the look I wanted.
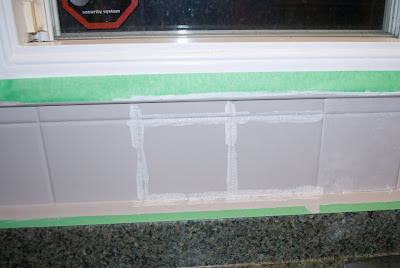 I started by using the lightest colour (glaze/paint mix) and tapped it in the grout lines with the foam brush.
 Then wiped off the tiles, trying to leave the paint in the grout.
 Then using a variety of the 3 colour of paint, I sponged them on the tiles.
 And then using a tapping motion removed most of it with a clean dry rag.
 Then using an artist brush I added more paint in the grout and wiped off any extra.
 I put 2 coats of polyurethane over top to seal it all in and give it a bit of a gloss.
 I think it looks amazing. You wouldn't guess it was painted. I think the key is to spend the time on the grout. This wasn't a fast project but it was well worth it since it's updated the dated kitchen so much.
If we were staying we were thinking of painting the cabinets as well but at least the horrible tiles are covered up. We only wished we had done this sooner. Since I already had the primer and glaze, the project cost only $30.
It also seems like it should last a while as long as you don't scratch it too much (which you don't do much of on a back splash). Since it's coated with polyurethane it wipes up easy too. And really even if it chipped a bit it would still look better than it did. I think the key is making sure it dries well in between coats and adding at least 2 coats of polyurethane.


4 comments:
Wow huge transformation Great job. I would have done the same thing. It looks wonderful. I bet your smile everytime you are in your kitchen.
Don't you love how paint can pretty much transform anything? Thanks for your comment on my painted granite countertops! :)
And isn't that the way? You always hear people saying "we wish we had done this sooner!" I try to always start the project in my head ASAP because I don't want to get to the point where I'm moving & I do it to make the house more 'attractive' and then really regret not doing it for ME earlier ;)
Great transformation, just priming and painting the tiles made them stand out but the texture really makes them pop, great job!
Wow. I mean, WOW! Hard to believe what a difference it made. Thanks for sharing such a wonderful project.
Post a Comment